Introduction
This is a project I’ve been wanting to tackle for a long time. I became inspired from Sentdex’s “Python Plays GTA” series on youtube where he trains a tensorflow model to drive a car in GTA V with python. This series was released 7 years ago and there have been significant advancements in python’s speed and object detection models. Lets try to make our own!
Goals for this series:
Screen Capture
We need a way of capturing the game window so we can generate training data and perform object detection. I found the python mss library does this in an acceptably performant manner and it also integrates easily with opencv.
import mss
import numpy
import opencv

#Area of screen to capture
mon = {"top": 40, "left": 0, "width": 800, "height": 640}

#Window title
title = "[MSS] Fast Screen Capture"

#Mss object instance
sct = mss.mss()

#Capture image data in numpy array
img = numpy.asarray(sct.grab(mon))

#Display image with opencv
cv2.imshow(title, img)
Key Logging
We need a way of logging user input for the generating the training data. It took a lot of experimenting to find something that achieved this in a non blocking way.
from pynput import keyboard

def on_press(key):
    global active_key

    try:
        active_key = key.char

    except AttributeError:
        active_key = key


def on_release(key):
    global active_key

    active_key = "No Action"

listener = keyboard.Listener(on_press=on_press, on_release=on_release)
listener.start()


#In our main loop we can display the active key pressed in the top left corner of the window
img = cv2.putText(img, str(active_key), (50, 75), cv2.FONT_HERSHEY_SIMPLEX, 1, (255, 255, 255), 2, cv2.LINE_AA)
Object Detection with YOLOv11
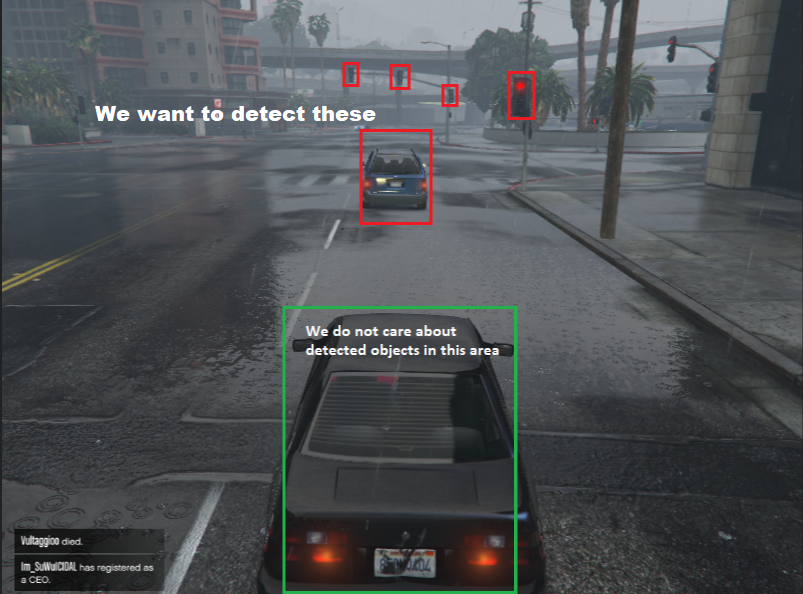
Next we need to identify critcal objects in our frame. Things relevant to us could be other cars on the road, traffic lights, stop signs, and pedestrians. Thankfully the YOLOv11 base model supports detection for all of these things. This is achieved with the Ultralytics module and CUDA Tool Kit. The versions used in this project are pinned in the repo linked at the end of the article. Ultralytics will download the model for us :). We also don’t want to detect objects in non relevant areas. For example, our own car or things in our blind spots. We can do this by drawing a bounding box and checking if the center of the detected object falls within that polygon. This is easily done with basic geometry and the shapely module. The below code should be considered psuedo code but is very close to being functional.
import opencv
from ultralytics import YOLO
from shapely.geometry import Point
from shapely.geometry.polygon import Polygon

# Declare yolov11 model
model = YOLO("yolo11n.pt")

# Check for CUDA/GPU
if torch.cuda.is_available():
    device = torch.device("cuda")  # Use GPU
    print("Using GPU:", torch.cuda.get_device_name(0))
else:
    device = torch.device("cpu")  # Use CPU
    print("Using CPU")


# Detect objects with YOLOv11 in our frame and determine if they fall within the exclusion zone
def predict_and_detect(chosen_model, img, classes=[], conf=0.5, rectangle_thickness=2, text_thickness=1):
    results = chosen_model.predict(img, classes=classes, conf=conf, device=device)
    for result in results:
        for box in result.boxes:

            # Check if detected object is in exclusion zone.
            middle = ((int(box.xyxy[0][0]) + int(box.xyxy[0][2])) / 2, (int(box.xyxy[0][1]) + int(box.xyxy[0][3])) / 2)
            middle = Point(middle)

            if exemption_zone.contains(middle):
                color = (255, 0, 0)

            else:
                color = (0, 128, 0)

            cv2.rectangle(img,
                         (int(box.xyxy[0][0]), int(box.xyxy[0][1])),
                         (int(box.xyxy[0][2]), int(box.xyxy[0][3])),
                         color, rectangle_thickness)

            cv2.putText(img,
                        f"{result.names[int(box.cls[0])]}",
                        (int(box.xyxy[0][0]), int(box.xyxy[0][1]) - 10),
                        cv2.FONT_HERSHEY_PLAIN, 1, color, text_thickness)

    return img, results

# Display the picture
cv2.imshow("Big Smoke Uber", img)
Bring It All Together
Now we can successfully capture the game screen, user keystrokes, and detect objects within the GTA world. Next, we will model out our dataset and generate training data for our self driving model. Stay tuned!
Repository: https://github.com/Sphyrna-029/big-smoke-uber


